Follow Me on Pinterest Instagram
Powered by Blogger.

Monday, October 31, 2011

Pumpkin Oatmeal Cookies

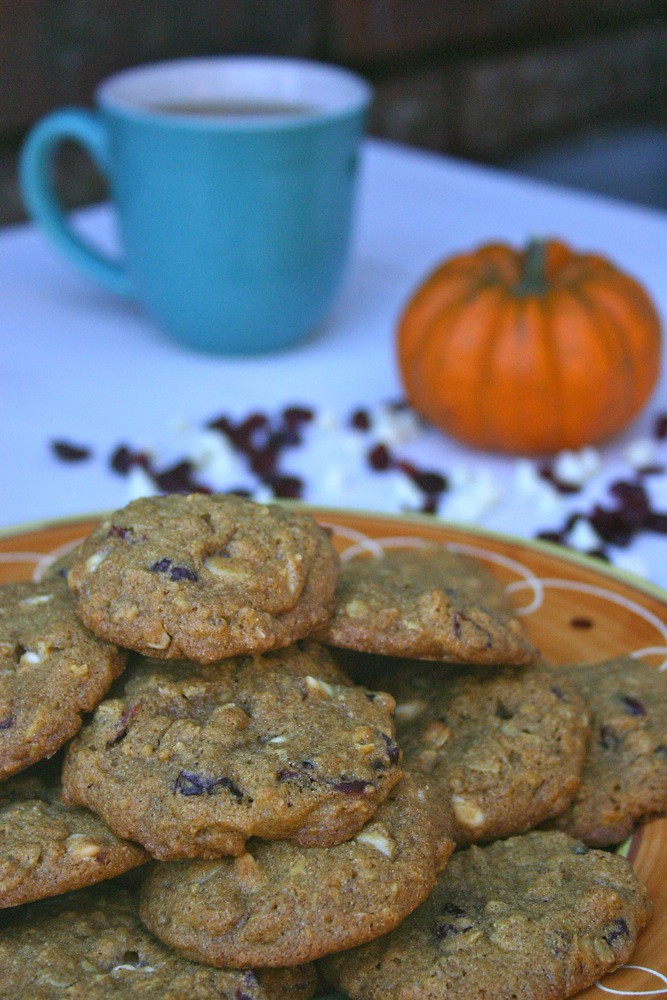
 One of my favorite things about fall is how everything becomes pumpkin flavored.  I've been making pumpkin bread every year since I was in kindergarten, but up until a few years ago I had never made pumpkin cookies.  Justin and I were throwing a spiked cider fall party and I needed a dessert to go with it.  I looked up a few oatmeal cookie recipes and wound up concocting what is now my famous Pumpkin Oatmeal Cookies with Cranberries and White Chocolate Chips (okay well, famous at least among my friends and family).  So this year, going gluten free, I decided to work at the recipe some more and make it fit for my new diet.  They taste exactly like the ones with all purpose flour.  The tart little bites of cranberry, smooth sweetness of the white chocolate chips, warmth from the cinnamon, and burst of pumpkin flavor make these my absolute favorite cookie.  It is nearly impossible to eat just one. 

Pumpkin Oatmeal Cookies with Cranberries and White Chocolate Chips
Recipe a Jesicakes original
Makes 36-40 cookies
Ingredients
- 1 cup unsalted butter
- 1 cup packed light brown sugar
- 1 cup white sugar
- 1 large egg
- 1 cup pure pumpkin puree (not pumpkin pie mix)
- 1 tsp gluten free vanilla
- 1/2 cup brown rice flour
- 1/2 cup oat flour
- 1/2 cup sweet rice flour
- 1/2 cup tapioca flour
- 1/2 tsp xanthan gum
- 1 1/2 cups gluten free old fashioned rolled oats
- 1 tsp baking soda
- 1 Tbsp cinnamon
- 1/2 tsp salt
- 1 cup dried cranberries
- 1 cup white chocolate chips

Tuesday, October 18, 2011

Brownie Update! Epresso Brownies!

Justin (my boyfriend) ran in a half marathon in Baltimore this weekend.  So I wanted to surprise him when he got home with his favorite treat...brownies.  I've made these brownies plain, and as cookie brownies (recipe one day soon...promise!), but I wanted to try a new way.  I love adding coffee to chocolate.  Even a hint of coffee actually enhances the chocolate flavor.  So remember the Blissful Brownies post I made?  I added 3 Tablespoons of Instant Espresso to that recipe.  If I thought those brownies were addictive before, I was wrong...well, I wasn't wrong, but the espresso in this new recipe makes them extra addictive.  The espresso makes them even richer, more chocolately, not to mention the espresso flavor gives it a bit more complexity.  Coffee and chocolate are meant to be together.  The addition of the espresso makes these brownies irresistible.  I may have had three...I think Justin may have had 5!  So while you should refer back to that post for the procedure, here are the ingredients again as a refresher.

Irresistible Gluten Free Espresso Brownies
Recipe adapted from The Weather In Cascadia, whose recipe was adapted from Gluten Free Goddess
Fills a 8'' X 8'' pan
Ingredients
- 4 oz 60% cocoa Ghiradeli bittersweet chocolate bar, roughly chopped 
- 3 Tbsp cocoa powder (Hershey's, or any non-Dutch processed)
- 1 Tbsp canola oil (or vegetable)
- 1/2 cup unsalted butter
- 2 eggs
- 3/4 cup packed light brown sugar
- 2 tsp gluten free vanilla
- 1/2 cup of almond flour (I used a coffee bean grinder to grind fresh almonds)
- 1/4 cup brown rice flour
- 1/2 tsp fine sea salt
- 1/4 tsp baking soda
- 3 Tbsp Instant Espresso (not ground espresso, I used Ferrara Instant Espresso)

I mixed the espresso in with the chocolate mixture right before adding the chocolate to my mixer.  For the full procedure go to the original post for my Gluten Free Brownies.  Enjoy!

Tuesday, October 11, 2011

Delicious Apple Crumble Cake

When I think of fall desserts I think of two things: Pumpkin and Apple.  Apple is also one of the traditional foods for Rosh Hashanah.  So I decided I was going to make a delicious apple cake using local apples (one of the many benefits of living in NY) for the holiday...only my family's party was canceled.  But I found a recipe on Oh! Nuts' blog for a Rosh Hashanah Apple Crumb Cake that looked too good to not try. So this past Sunday I made it anyway!  I replaced the flour in the crumbs and the cake with a mix of gluten free flours I thought might work out well. My guessing was right on because this cake is delicious.  The cake is moist, but the apples are still firm and the crumble and walnuts add a nice crisp texture.  This cake is perfect for all those apples you'll be bringing home from apple picking, and if you're really ambitious this recipe calls for applesauce...which if you still need something to make you can use homemade applesauce (I was not that ambitious.  Well, actually I have not gone apple picking yet so maybe I will be once I come home with a few pounds of apples).  This cake screams fall between the apples and the cinnamon.  Plus it's best served warm...and if you're like my boyfriend, with homemade cinnamon maple whipped cream.  It's the perfect cake to eat outside on a cool fall day.

Apple Crumble Cake
Recipe from Oh! Nuts
Made Gluten Free by Jesicakes
Makes a 9'' round cake
Ingredients for the Crumble
- 1 1/2 cups walnuts
- 2/3 cup packed light brown sguar
- 3 Tbsp granulated sugar
- 2 rounded tsp cinnamon (I use more than Oh! Nuts...I'm a huge cinnamon lover)
- 1/4 cup brown rice flour
- 1/4 cup sorghum flour
- 1 Tbsp tapioca flour
- 1/4 tsp xanthan gum
- 4 Tbsp unsalted butter, melted
- 1/2 tsp gluten free vanilla
Ingredients for the Cake
- 1 large Honey Crisp of Fuji Apple, and an extra just incase*
- 2 tsp lemon juice
- 2 large eggs, room temperature
- 3 Tbsp sour cream, room temperature
- 1/4 cup unsweetened applesauce, room temperature
- 2 tsp gluten free vanilla
- 1/2 cup brown rice flour
- 1/2 cup sorghum flour
- 1/2 cup sweet rice flour
- 1/4 cup tapioca flour
- 1/2 tsp xanthan gum
- 1 cup white sugar
- 1/2 tsp baking soda
- 1/2 tsp gluten free baking powder
- 1/4 tsp salt
- 2 tsp cinnamon
- 12 tbsp butter, room temperature

*My secret to baking with apples is using Honey Crisps (if in season like they are now) or Fuji's.  They're firm so they hold up well being baked, and I find them to simply taste better than Granny Smith or Yellow Delicious.

This post is a little photo heavy because of the steps and the layering of the cake.  So click "Read more" for the procedure.